


Double-bevel marquetry starter guide
I finally wrote down what you get if you want to give double-bevel marquetry a shot.

I can’t possibly tell you how many times people have messaged me asking what they need to get started with double-bevel marquetry. I also can’t tell you how many times I’ve said that I really should put something together. So here it finally is.
I don’t intend for this to be any type of authoritative guide on how one should go about getting started with marquetry. What follows is just what I’ve learned from my experience, and there are certainly many other alternatives available. I do, however, think that the method I use is very welcoming for beginners, and it doesn’t hurt that all the tools and materials I recommend are quite affordable.
So if you’ve wanted to give double-bevel marquetry a try but have no idea where to start, this is for you. By the end of this post, you should have everything you need to sit down at a desk or bench for 8 hours and cut tiny pieces of flowers until your eyes start crossing (i.e. The Art of Marquetry).
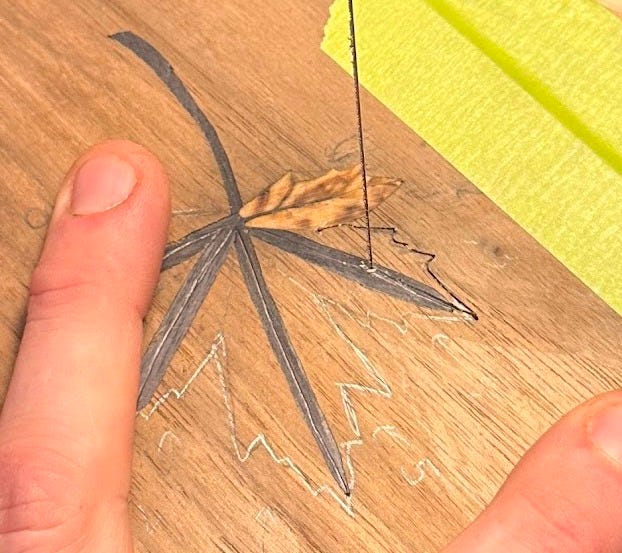
The first thing you are going to need is an understanding of what the hell double-bevel marquetry is, how it works, and how to do it. I’m not going to go over that here because it’s been written about plenty of times. Craig Stevens has a really great beginner article in Fine Woodworking that should tell you pretty much everything you need to know. If you want to go further, he also has an entire book on the subject that has a more step-by-step approach.
There are of course tons of authors/marquetarians out there, all with slightly different ways of doing and presenting things, but I really like Craig’s approach. It’s very simple and straightforward, and the process is something that I think those accustomed to making furniture will find relatively easy to pick up.
Beyond a general understanding of marquetry, you’ll also need some fairly specific tools and materials that you likely don’t already have kicking around the shop. None of these are particularly expensive, they just aren’t things that you would own unless you were already doing something similar to marquetry. And if that’s the case you probably aren’t reading this post.
Veneer — You can do double bevel marquetry with commercial veneer, but it is definitely not fun. Folks have developed methods to make the process less painful, but there’s no doubt that working with commercial thickness veneer is incredibly challenging. It’s best to stick with “shop sawn” veneer — something around 1/16” thick. This still has the dimensional stability of commercial veneer, but the added thickness makes it much easier to saw and keep together.
“Shop sawn” veneer is called that because you can saw it right in your own shop (it’s thick and cut with a saw, unlike commercial veneer, which is thin and typically rotary cut). Usually this process requires you to have a fairly decent bandsaw to cut the veneer and a drum sander to bring everything down to final thickness (you really don’t want to be using a planer on material that thin). Of course, there are ways to get around everything, and I’ve grown accustomed to just taking my sweet time setting up my bandsaw and resawing to 1/16” right away since I don’t own a drum sander.
I’ve also seen folks use narrow enough stock, such as turning blanks, to cut veneer off at the tablesaw. As long as your project doesn’t require any pieces that are too wide or you’re fine with edge gluing, this isn’t a terrible option.
You can skip all of that by just going ahead and buying pre-thicknessed veneer. Woodcraft and Rockler tend to have some 1/16” veneer on their shelves if you go into a brick and mortar store (earlier today I saw maple, Spanish Cedar, and Mahogany. That’s it). You can also order individual small sheets from Ocooch Hardwoods, although sometimes their sheets are out of spec and their customer service won’t get back to me about that. For dyed veneer, I usually go to Roarockit or VividStripes — both of those are good options and have slightly different colors, so don’t be afraid to buy from both to get a more diverse pallet.
Sawing donkey — There are plenty of ways you can go about making a sawing table — or “donkey” — for double-bevel marquetry. Craig Stevens has some pretty nice plans in that article I linked earlier, but you can go even simpler. All you really need is a table with a bird’s mouth in it. If you can clamp that into your vise on an angle, you’re good to go. Lee Valley has a super bare bones one that is perfectively serviceable — just make something that looks like that or save yourself the hassle and buy it.
Saw — Everybody thinks that they can do marquetry with that expensive red fret saw they bought to remove waste on dovetails. The problem is the throat on those tends to be around 5”. You’ll quickly find how limiting a throat that size is when trying to make cuts in the center of a panel. To do double-bevel marquetry of any size, you’ll need something with a much deeper throat — 12” or more.
Up until a few weeks ago, I used the Eclipse saw I got when I took my first marquetry class back in 2021. The thumbscrews on that one wore out, so I replaced it with the super cheap Olson frame available at The Bad Store. I find the clamps on the Olson to be much smoother, and the overall performance about the same. At under $20 you really can’t go wrong.
Blades — I’ve never had any problems with Pike brand jewelers blades. They’re cheap, come in packs of 144 (you’ll need them), and are available at The Bad Store. I use 2/0 blades in my work, which seems to be what most folks use. I’ve also used 4/0 blades with no issues, but remember, your sawing angle is determined by both the thickness of your veneer and the kerf of your blade. If you change your blade size, you’ll also have to alter your sawing angle, so it’s best to pick a size and stick to it.
Drill — Nothing really much to say here other than you need really fine drill bits and a way to use them. I use #69 size drill bits, although I’ve heard folks have no issues threading a 2/0 blade through a hole left by a #71 bit. Either way, a #69 bit has never given me issues in my work. I don’t have a preferred brand, so I usually just go to The Bad Store and look for whatever is cheapest.
To hold the drill bits, you’ll need a pin vise. These are super duper simple tools — they hold onto the tiny drill bits so you can turn them. I have this one and it works great. I never think about it.
Tape — Double-bevel marquetry requires a lot of tape. You are constantly taping and untaping packets of veneer, and you’ll quickly notice your garbage can overflowing with balls of tape. The best kind of tape for this task is any type of masking or painter’s (“blue”) tape.
Because you use so much of it, you might be tempted to cheap out and buy whatever has the lowest price. Resist the urge to do this. Cheap masking/painter’s tape tends to not have enough tack to keep veneer packets from shifting in the middle of cuts. If this happens, the result is never good.
This is probably the only item on this list where I have a strong brand/ type preference. I’ve tried so many different brands and types of tapes, and I’m certain that Scotch brand rough surface painter’s tape is the best for double-bevel marquetry. Since it’s made for rough surfaces, it holds onto veneer sheets very well, and individual pieces can be reused a few times before they lose too much tack to work properly anymore. This cuts down on waste and the mess you leave at your bench.
Tracing and carbon paper — if you plan on doing intricate patterns that will require many layered cuts, it’s probably good to have some tracing and carbon paper on hand. This will allow you to reapply your pattern to the field veneer after cuts have eaten away at your pencil lines.
.
All said and done, you could get started with marquetry for about $50. The cost of entry is low, there’s plenty of free information available online, and of course I’m here to answer any questions you may have.
And if you want further instruction, you can always take a class! There are plenty of great and incredibly talented teachers out there (Dave Heller, Craig Stevens, and Frank Strazza to name a few) that regularly teach in-person courses throughout the country. And if you’d prefer to learn from someone less talented and more clown-adjacent, I’m teaching a virtual marquetry course for Plane Wellness in December.
So why haven’t you tried yet?
This is a great resource for those of us starting out. I cobbled together the tools several years ago and am still playing around with simple designs whenever I get a free 30 minutes to an hour (which is sort of rare actually). I'm still fighting with getting TIGHT fitting pieces, but the few things I've made have impressed those that know less than I do so I think I'm moving in the right direction.
Certainly Wood is also an amazing resource. Their customer service is top notch. They don't have the most selection of thicker veneers but they certainly have some! Also their shipping is wicked fast.